


You have arrived at a website that explains complex topics in the simplest possible terms. Using this blog, you will learn how to use PancakeSwap with Trust Wallet and MetaMask.
You’ll learn:
- What is Trust Wallet?
- What is MetaMask?
- How to use PancakeSwap
- How to connect your wallet to PancakeSwap
What are Trust Wallet and MetaMask?
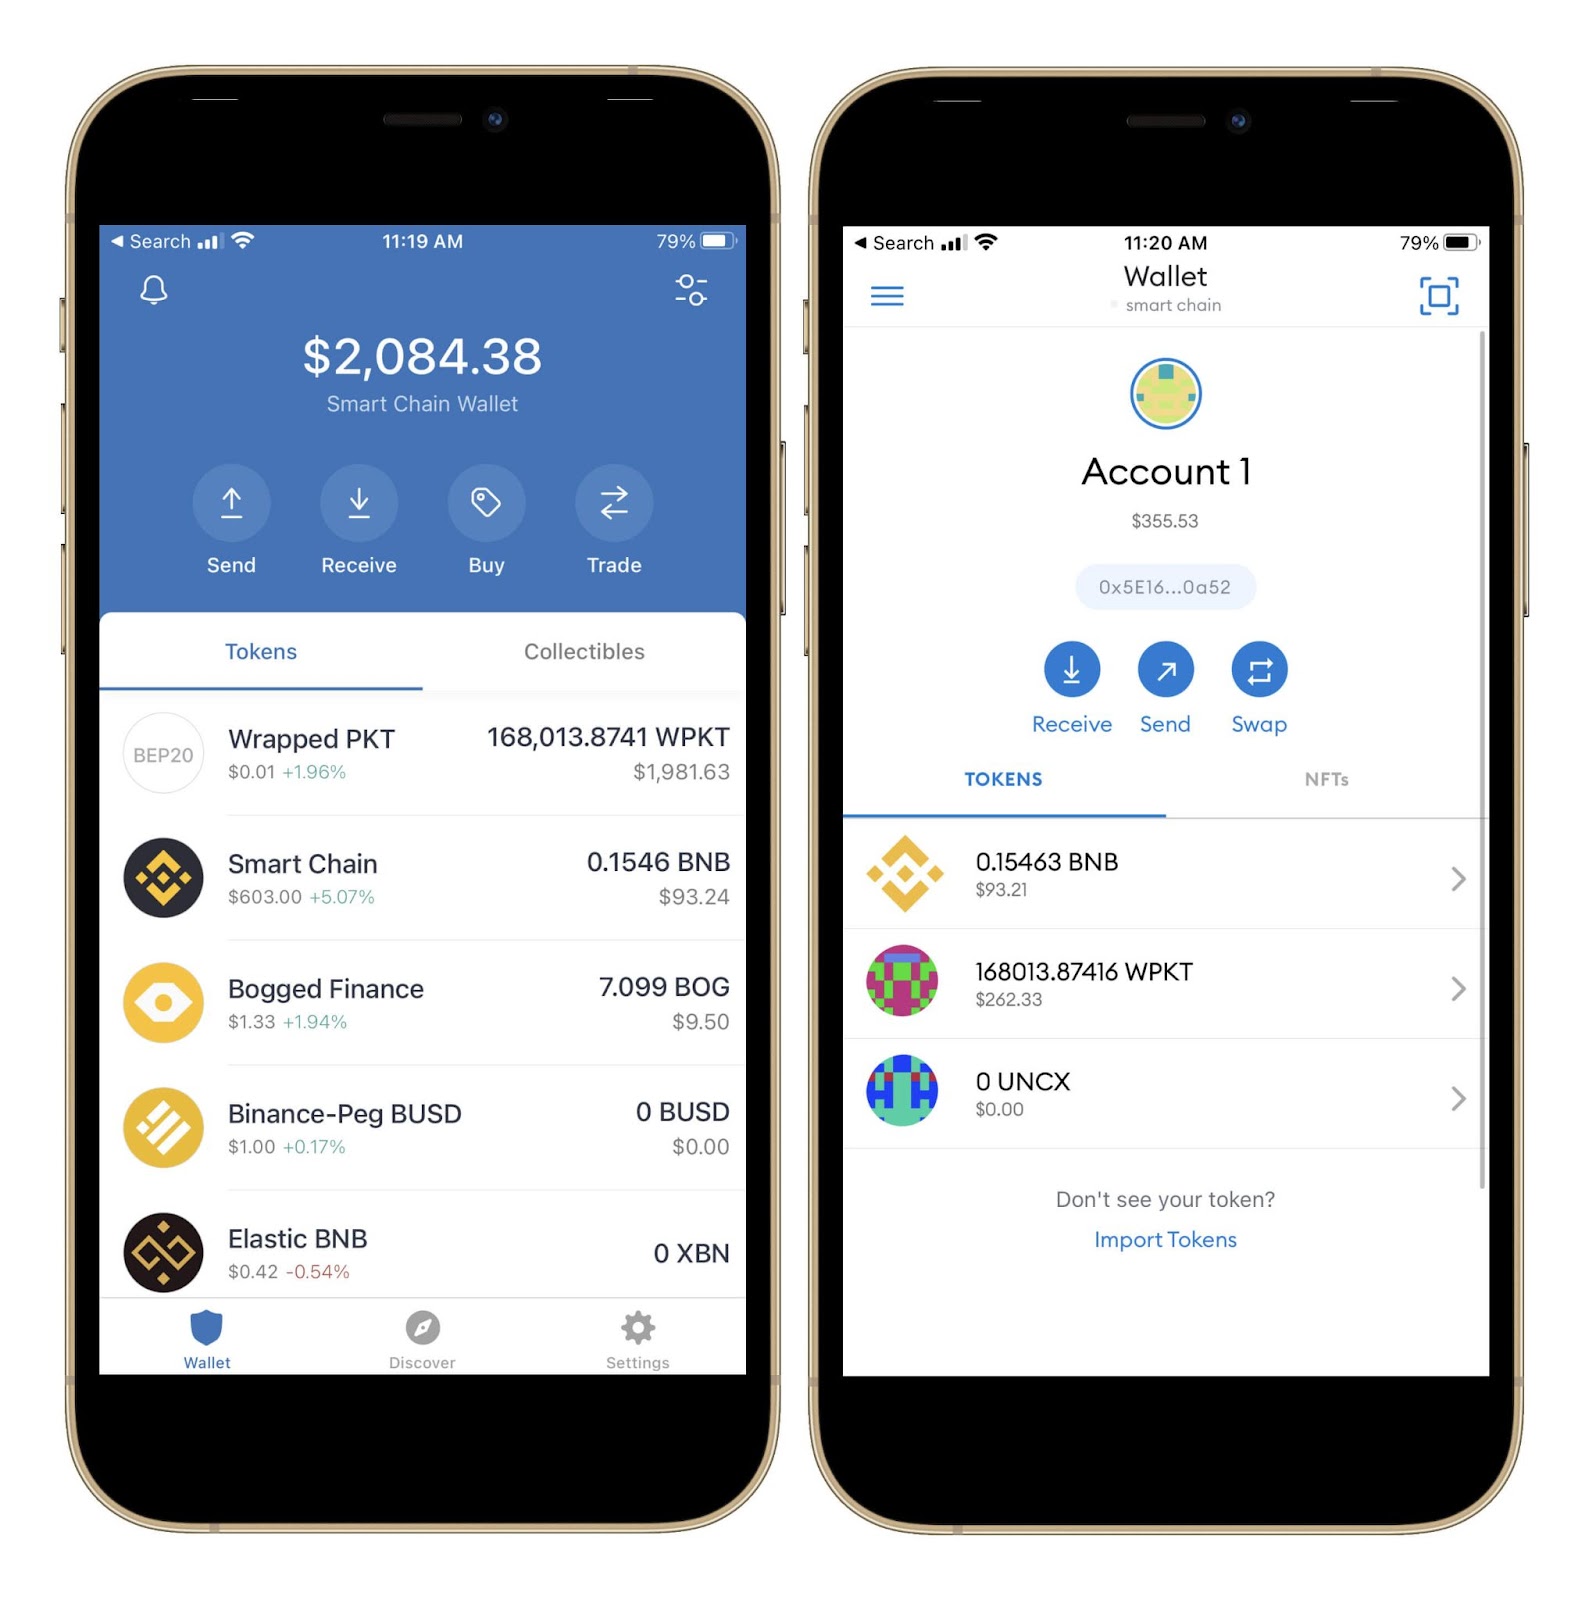
Trust Wallet and MetaMask are both decentralized applications that facilitate the sending, receiving, and trading of cryptocurrency. Due to the use of a 12 word-phrase key system, these applications are completely secure.
Please look at my other blogs to learn how to set up an account on each of these applications:
How to Connect Trust Wallet with PancakeSwap?
The first step in connecting to PancakeSwap is to gain access to it through a default browser.
1. Accessing PancakeSwap:
There are two methods to access Trust Wallet with PancakeSwap.
- For Androids:
Trust Wallet for Android includes a menu called the DApp menu, through which Android users can access PancakeSwap's DApp (Decentralized Application).
Now you will open the Trust Wallet application. A DApp menu can be seen below, the second from the bottom right.
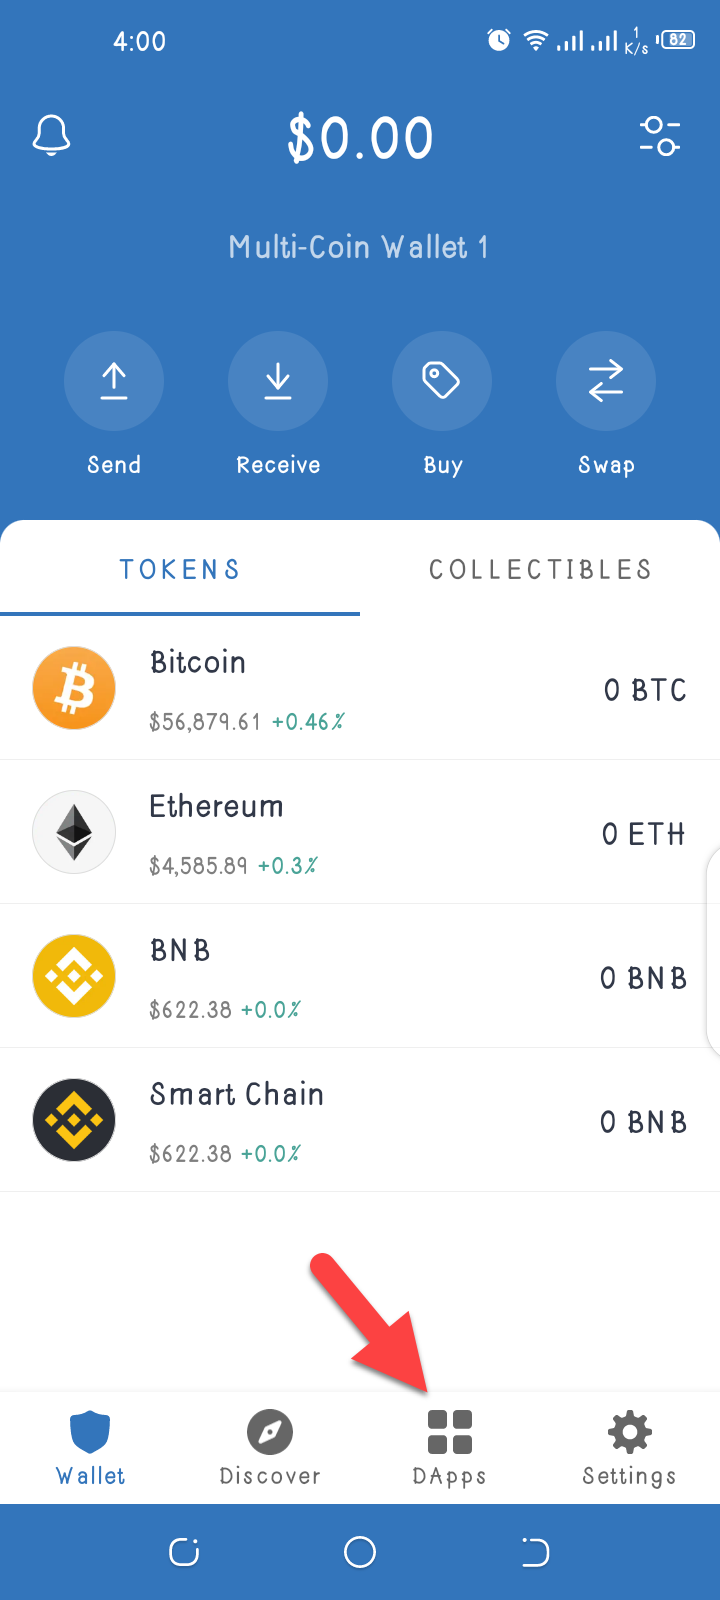
Once you click on it, a list of DApps will appear, but since you want to only access PancakeSwap, so you will tap on PancakeSwap DApp.
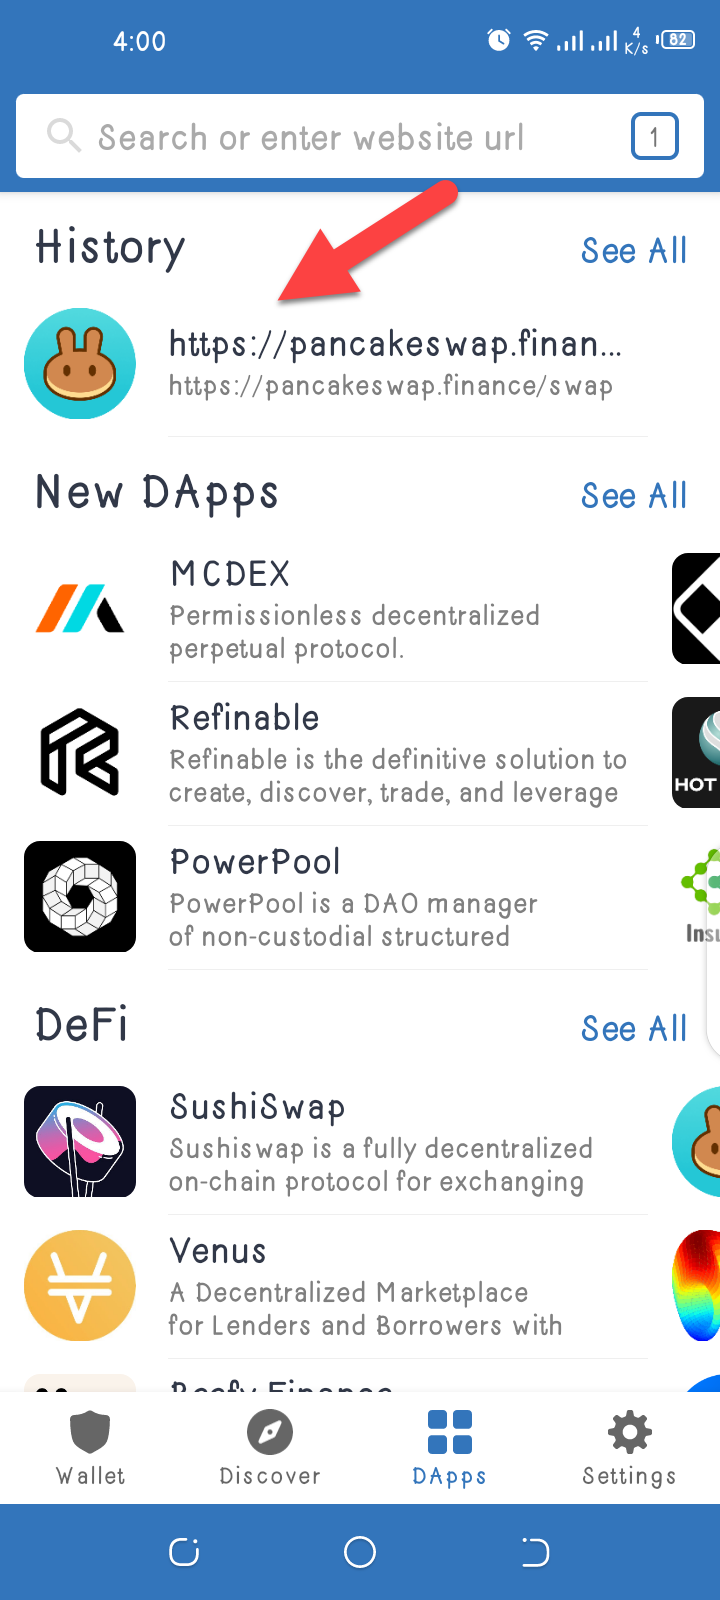
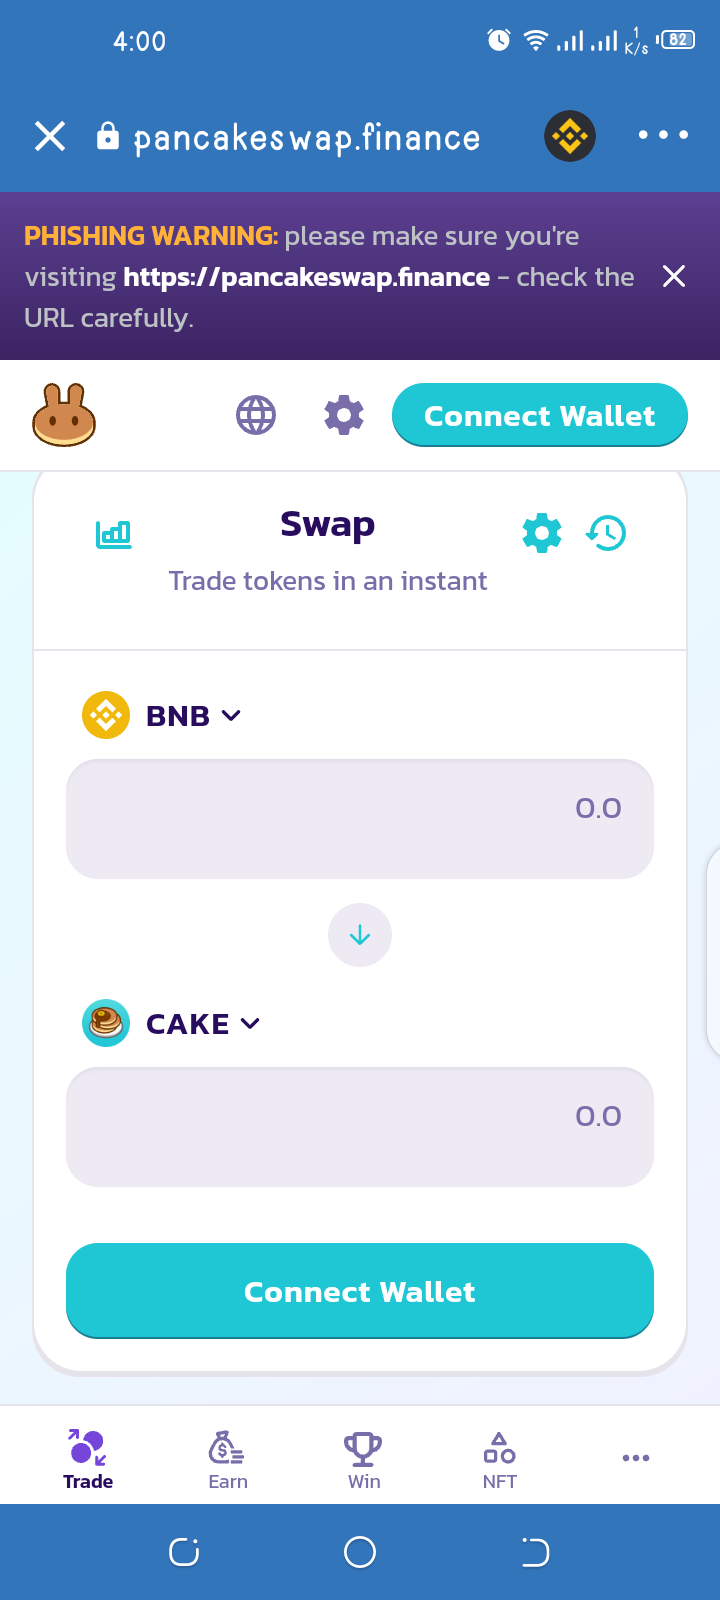
As a result, you can see the interface of the PancakeSwap, which will connect the Trust Wallet.
Before you can connect your wallet, you also need to know how to access PancakeSwap on an iOS device.
- For iOS:
In order to access PancakeSwap on an iOS device, you will need to open your device's browser and navigate to PancakeSwap.
2. Connecting Wallet
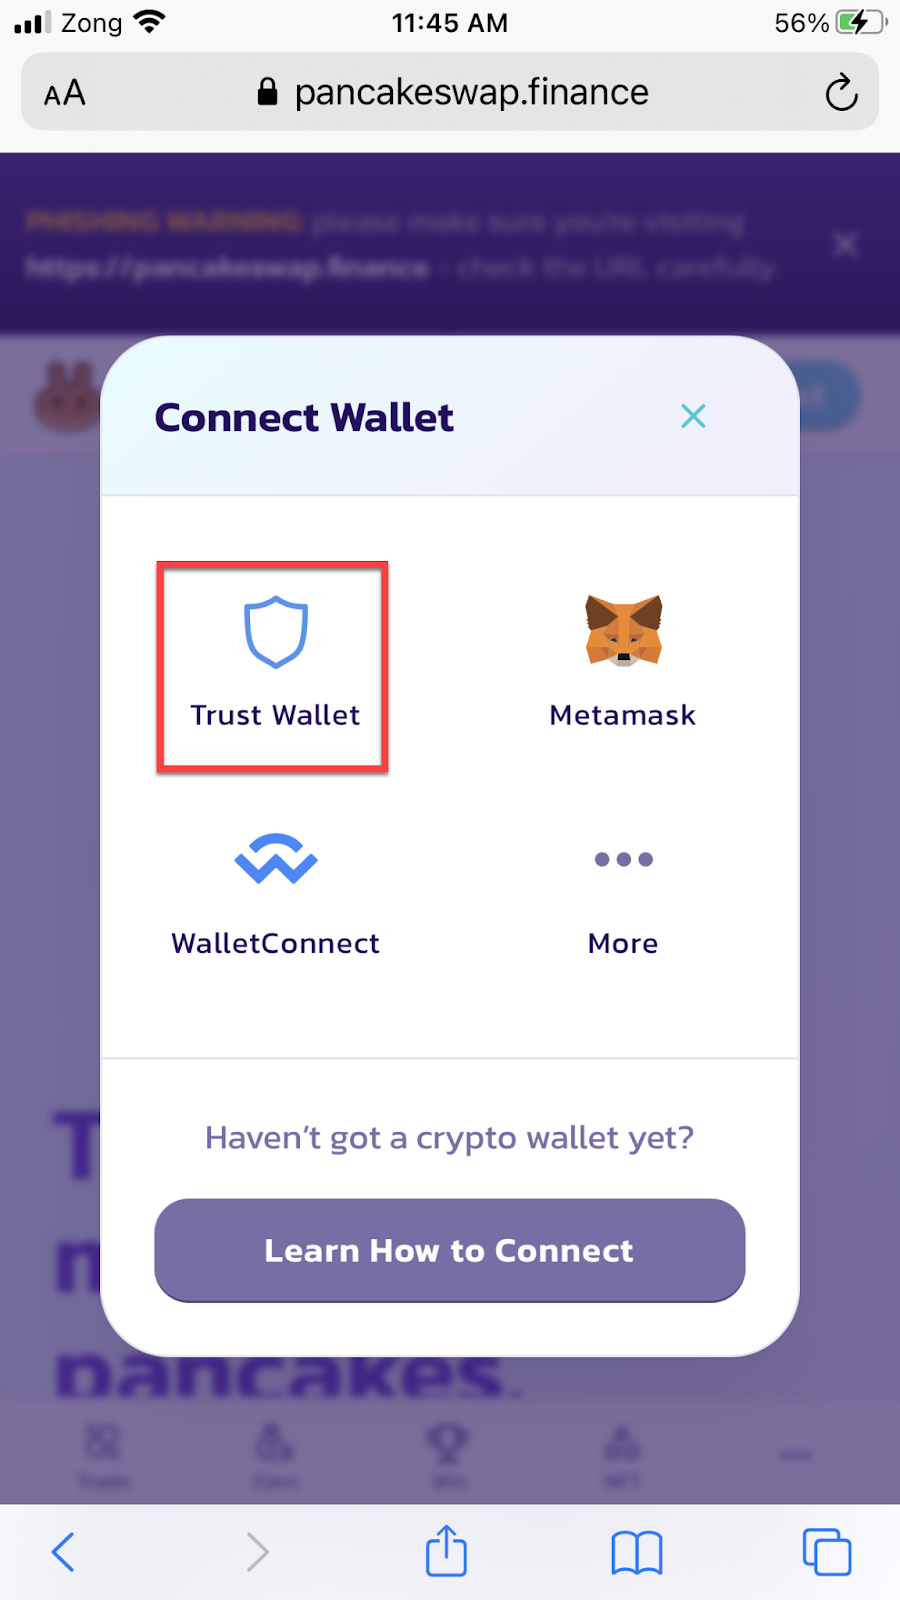
As soon as you have accessed the PancakeSwap, you will tap on the "Connect Wallet" button to connect the Trust Wallet.

You can now choose any of the wallets listed below, as you can see. you will select the "Trust Wallet" option.
You will receive a message on the Trust Wallet app to click on the "Connect" button.
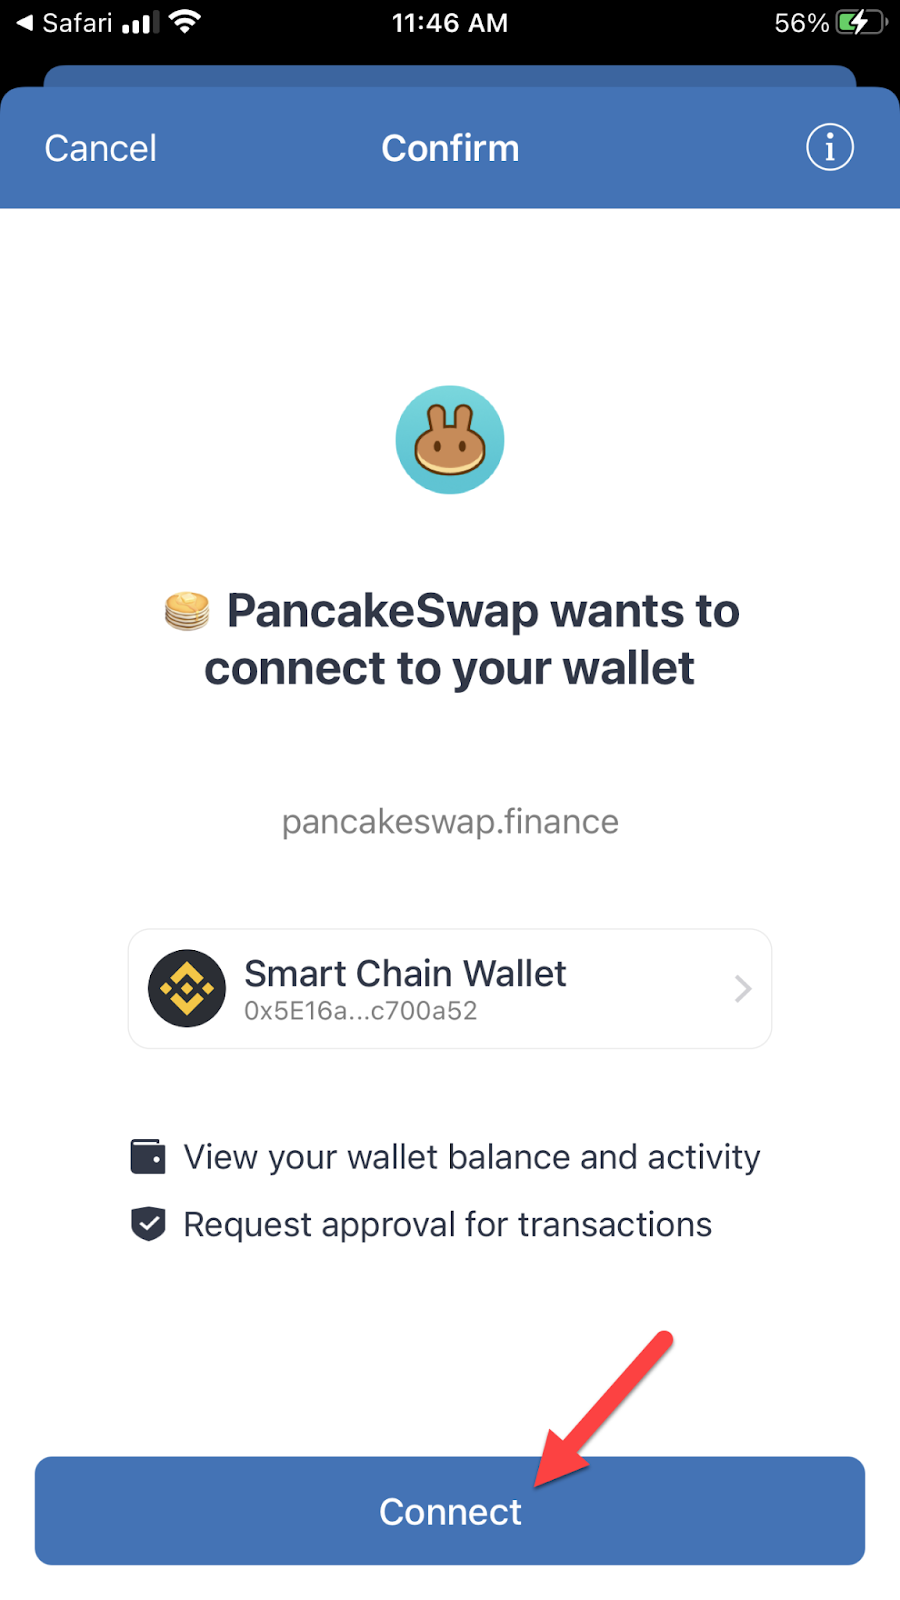
Now the wallet is connected to PancakeSwap. It is evident by looking at the same button which previously said "Connect Wallet," which now displays the wallet icon.

How to Connect to MetaMask with PancakeSwap?
Remember that only Enthruem is connected with MetaMask when you install it. PancakeSwap requires a Binance Smart Chain for full functionality. But how? Follow these instructions:
1. Connect to Binance Smart Chain
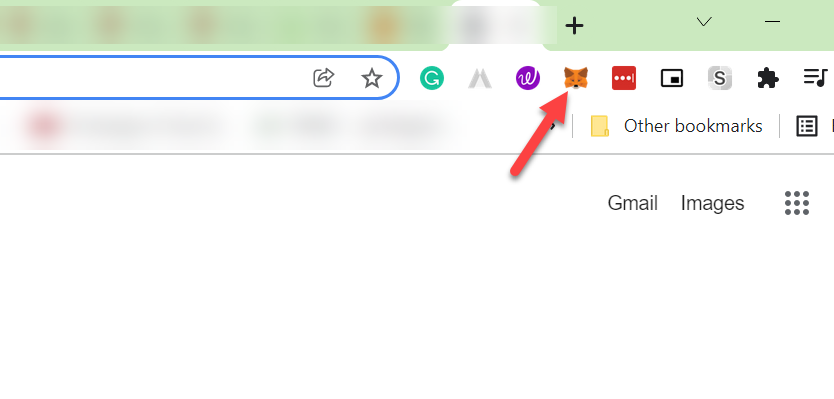
In order to connect to Binance Smart Chain, you must manually add the network to MetaMask. The first step is to click on the MetaMask extension icon.
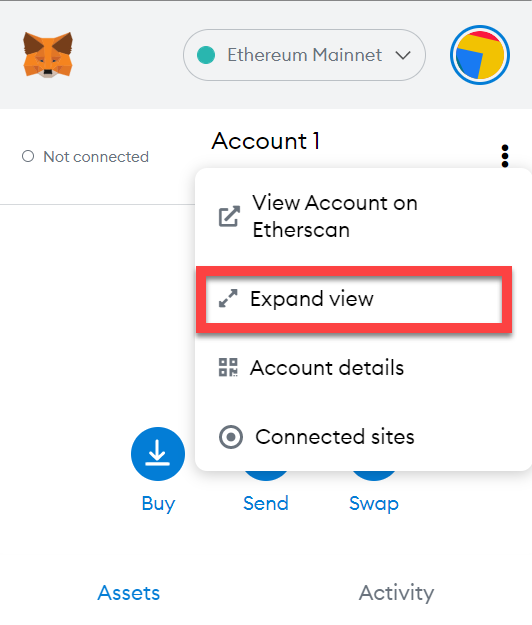
Then a drop-down box will appear with all of your account information. Right-click on the three dots icon on the top right-hand side.
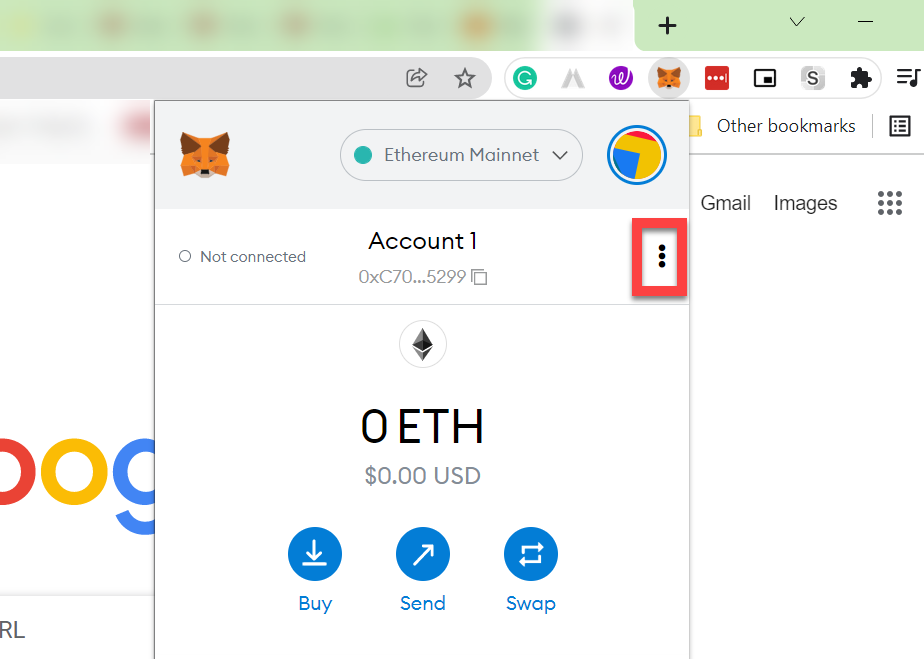
As you can see, another drop-down box appears from which you will click on the "Expand View" option. You will then be directed to another tab where you can view all the information.
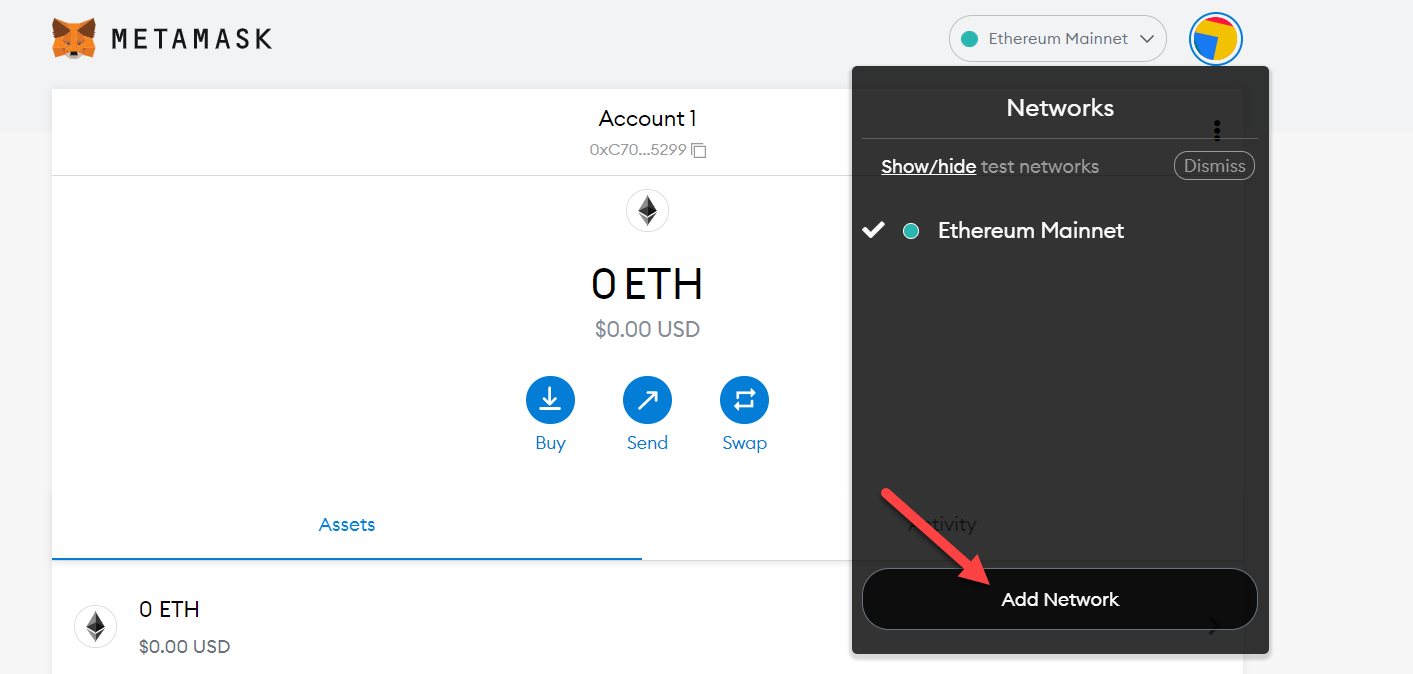
Now, you will click on the drop-down on the top right-hand side of the screen, which currently shows "Ethereum Mainnet."

A drop-down menu appears, and now you will click on the "Add Network" button.
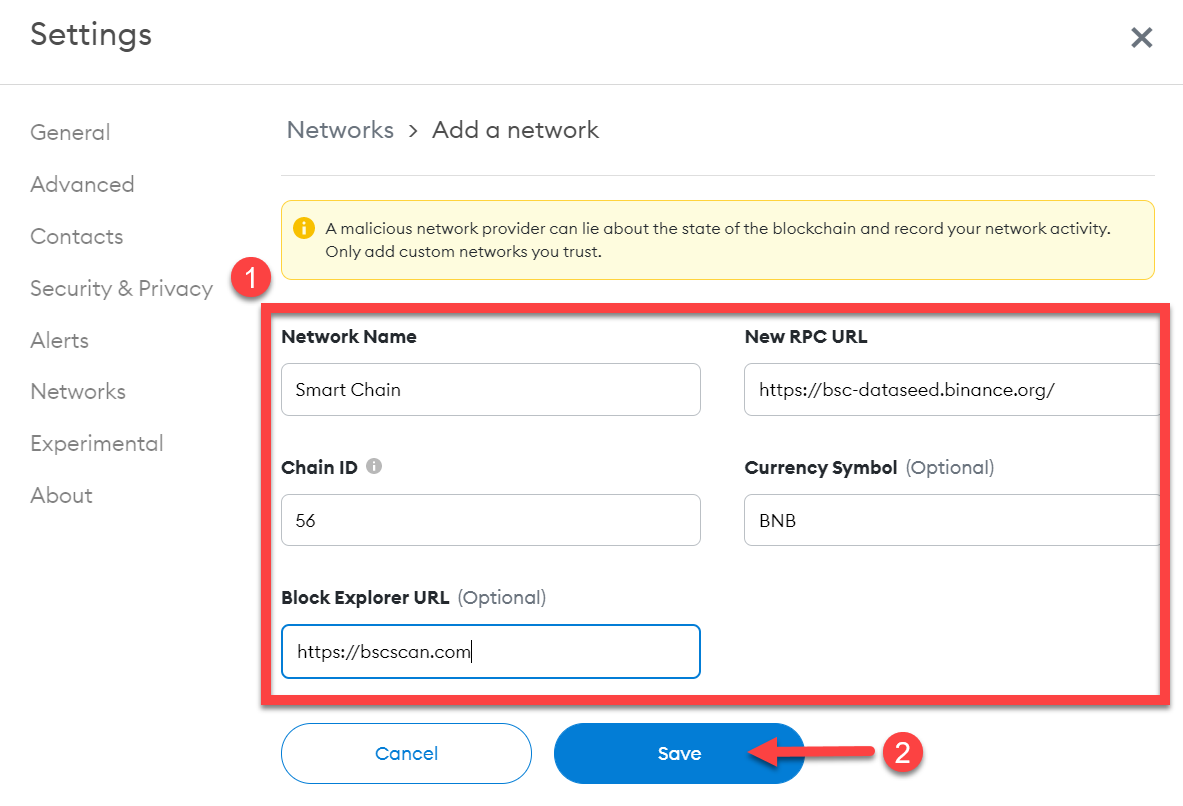
Here you will add the details for Binance Smart Chain Network. These details are as follows:
- Network Name: Smart Chain
- New RPC URL: https://bsc-dataseed.binance.org/
- ChainID: 56
- Symbol: BNB
- Block Explorer URL: https://bscscan.com
After entering these details, you will now click on the "Save" button.
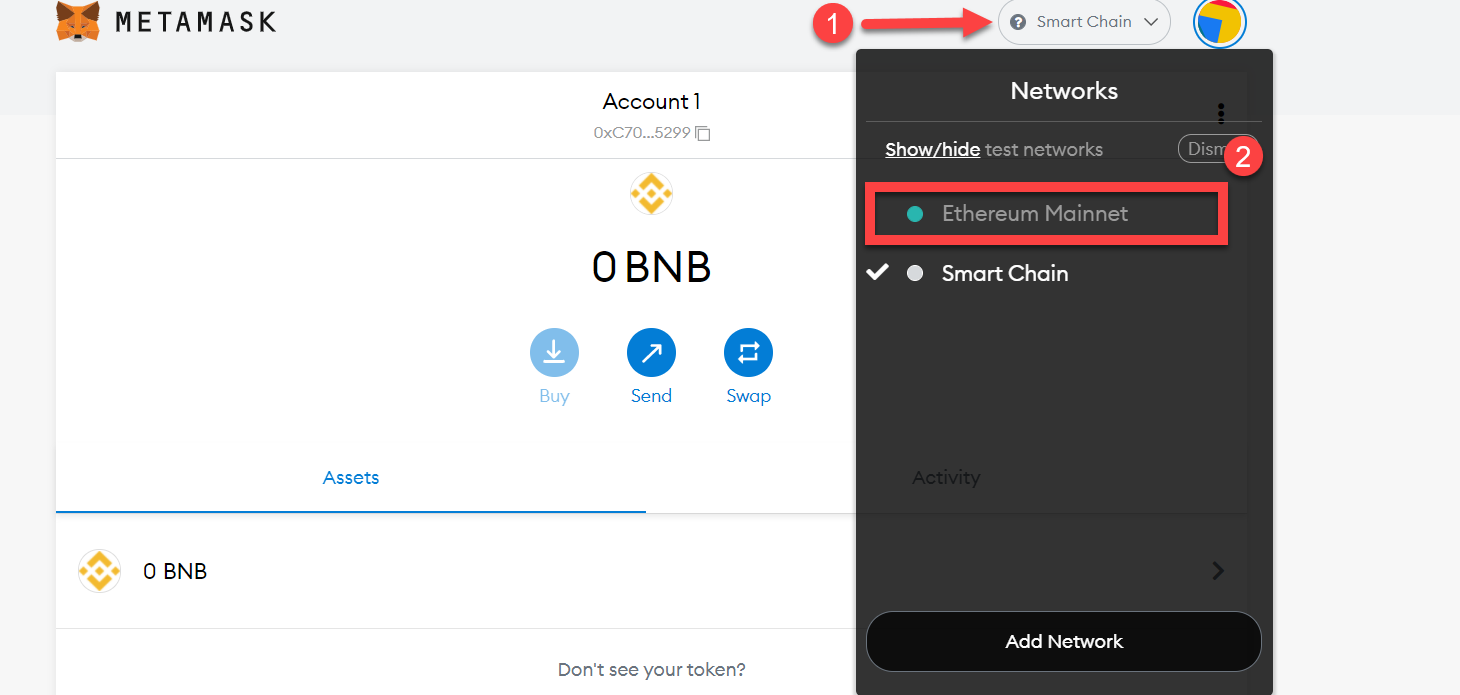
Now you are redirected to the main page of your account, where you receive a notification that shows that the "Smart Chain" was successfully added! Not to mention that the tokens have changed from "ETH" to "BNB."

Note: If you wish to return to Ethereum, click on the drop-down button, which now shows "Smart Chain," and select "Ethereum Mainnet."
2. Connect to PancakeSwap
Note: When you are using Metamask on your mobile phone, open PanCakeSwap in your default internet browser and tap Connect Wallet. A pop-up will appear, select MetaMask. Occasionally, it does not connect immediately, and it may take several attempts to connect.
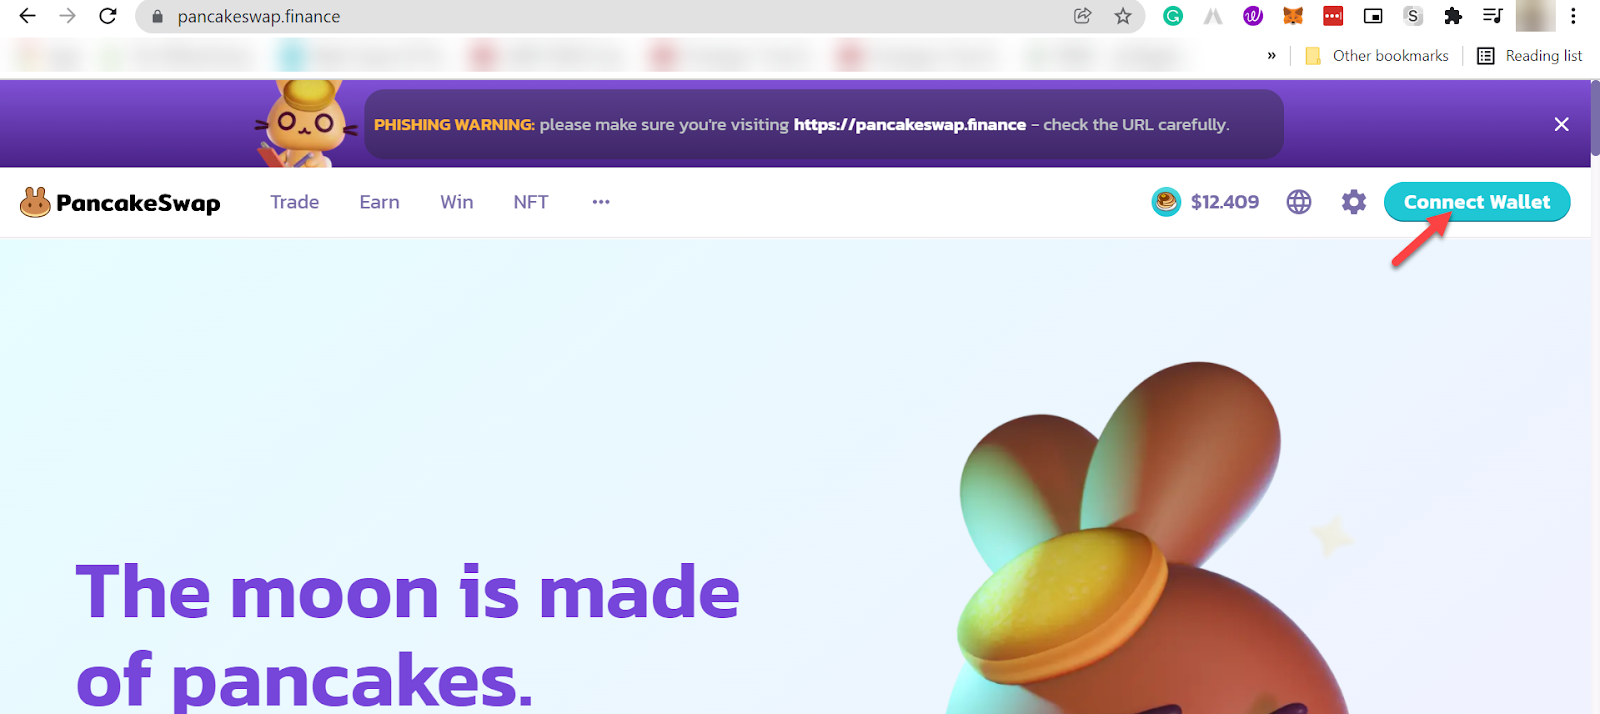
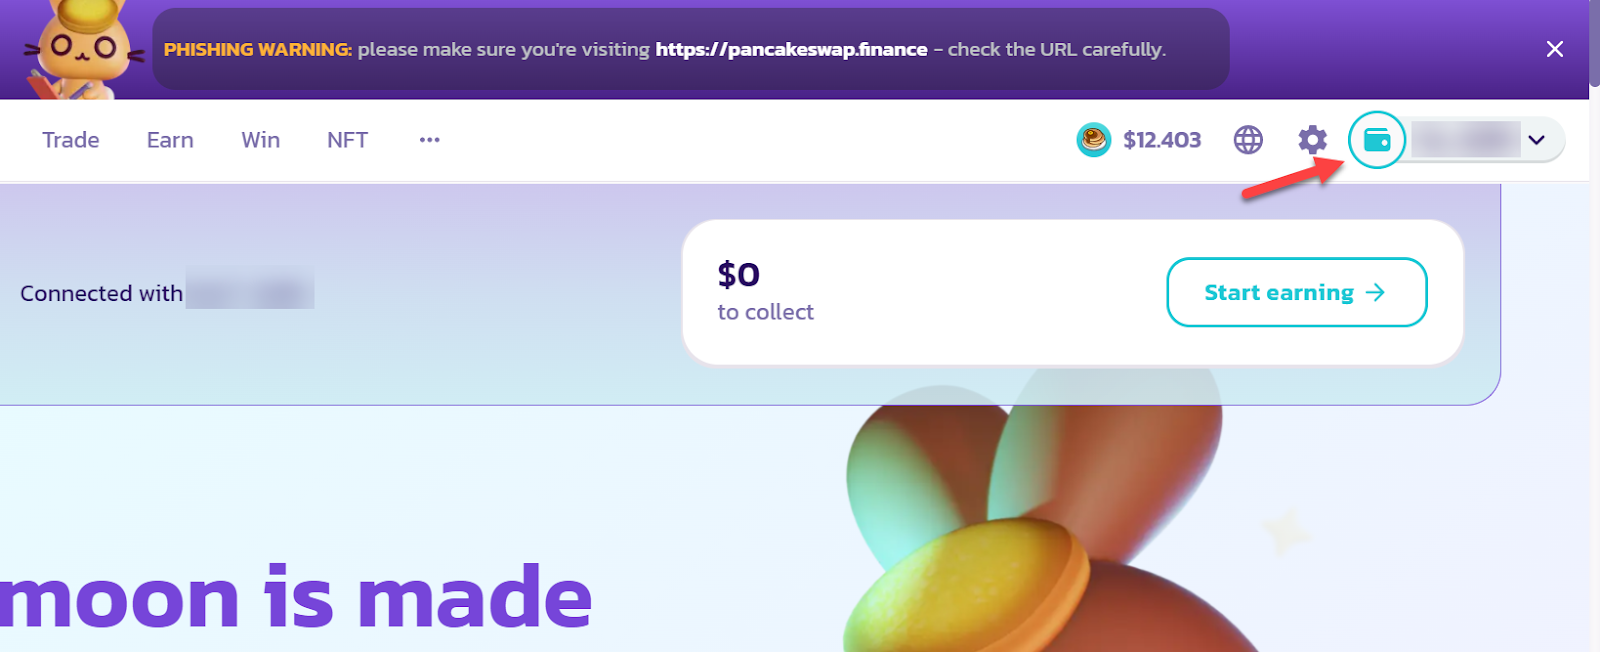
To connect to PancakeSwap, you will go to the PancakeSwap official website. Here, click on the "Connect Wallet" button.
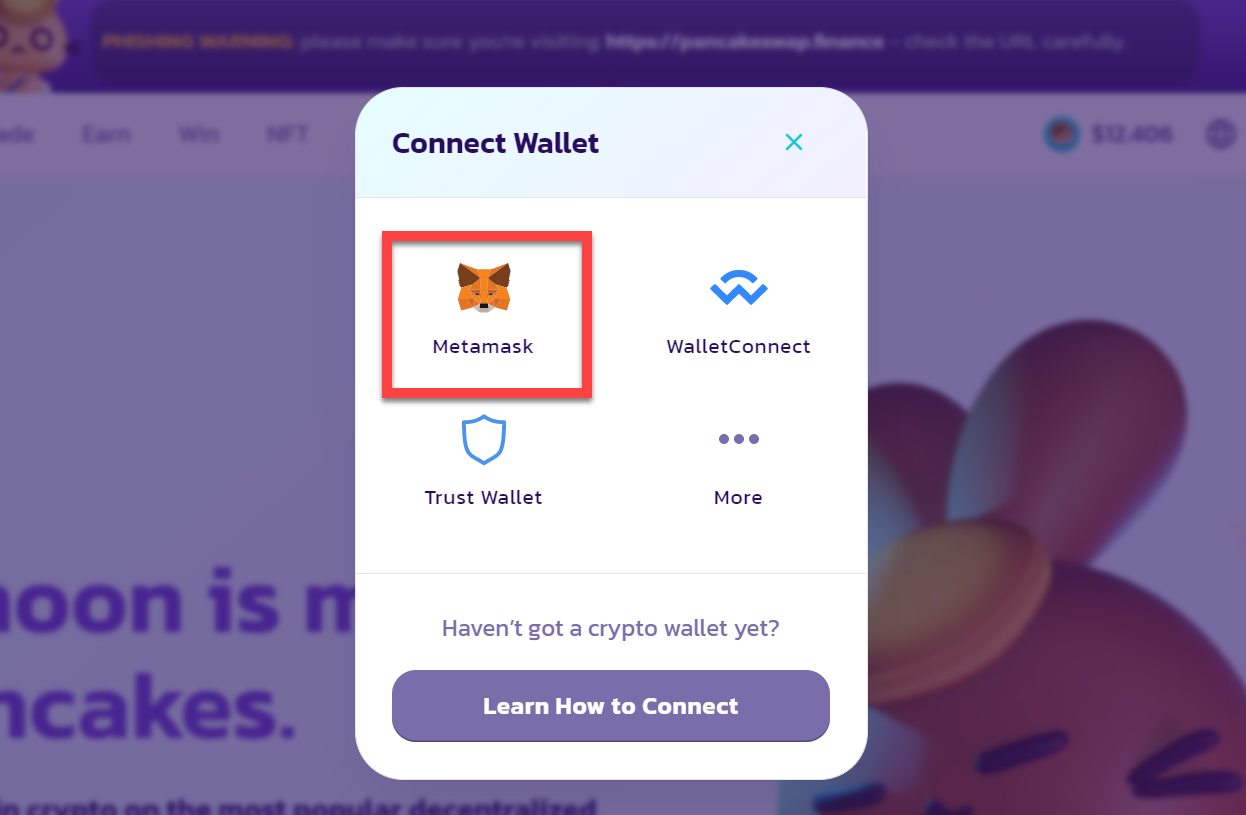
It is now apparent that there are several wallet options, but since you are using MetaMask, you should select that option.
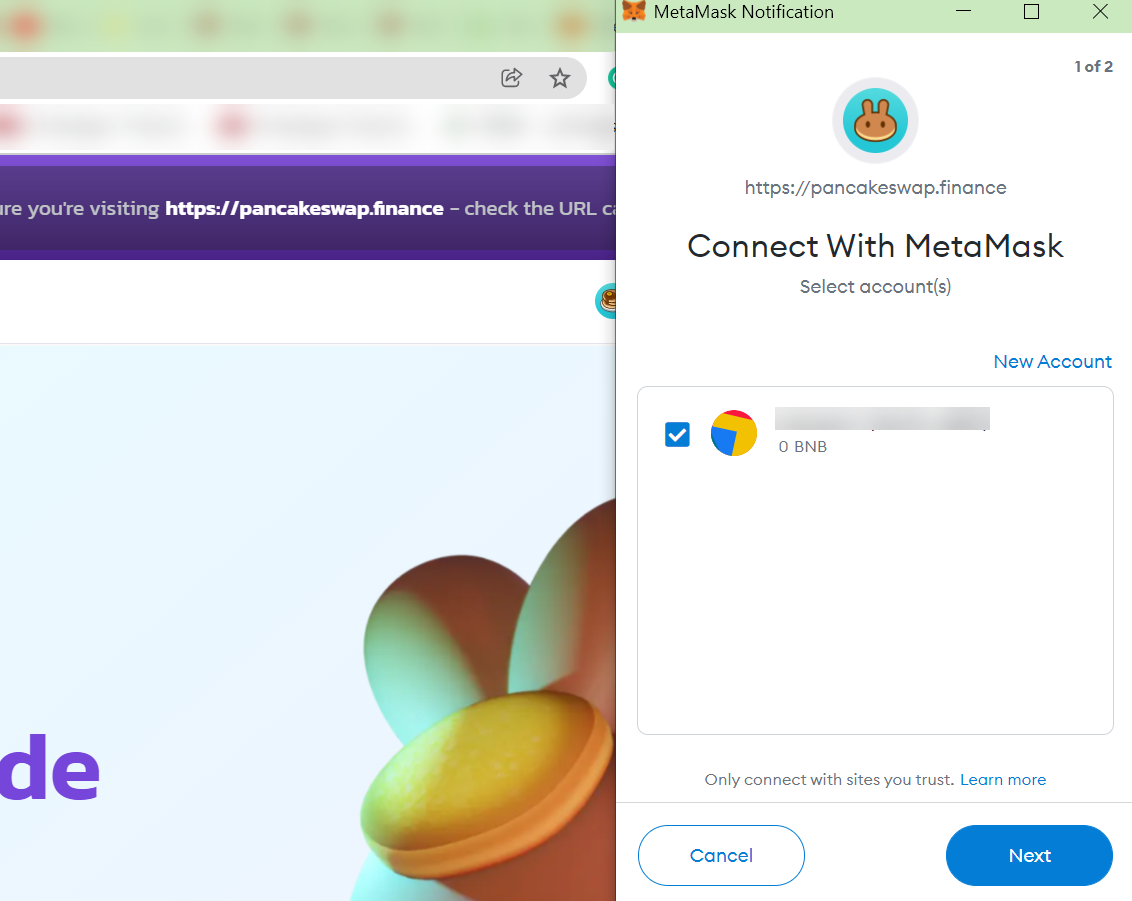
You can see on the right-hand side of the screen that you have received a notification from MetaMask regarding accessing the Pancake Swap. Next, you will click on the "Next" button.
As you can see, another notification pops up on which you will click on the "Connect" button.
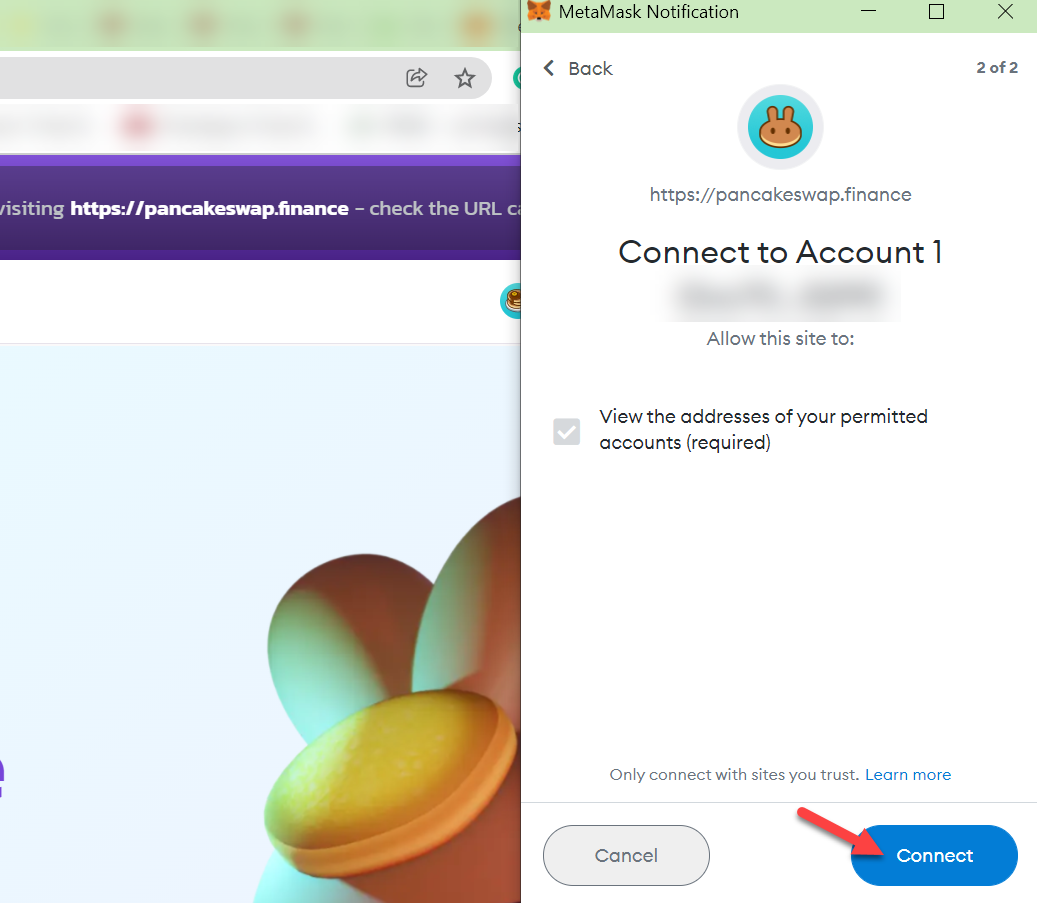
Now your Metamask is connected to Pancake Swap, which is evident because a wallet icon has appeared with the account's address.
How to Swap and Add a Coin?
Connecting to PancakeSwap is one thing, but now I will show you how to swap coins. The process is the same for both Trust Wallet and MetaMask. So there will be only one guide.
1. Deposit BNB as a Gas Fee
One of the most critical aspects is to add Binance Coin (BNB) that will act as a gas fee.
PancakeSwap is currently only supported on Binance Smart Chain that requires BNB. Therefore, it is impossible to swap from one token to another without having BNB in your wallet.
What is the procedure for depositing BNB?
In order to purchase BNB, you will use an exchange and then transfer BNB to your Metamask or Trust Wallet using the BEP20 Network.
This complex procedure has been explained in an easy-to-understand manner in how to buy altcoins on the BSC Network blog.
2. Open PancakeSwap:
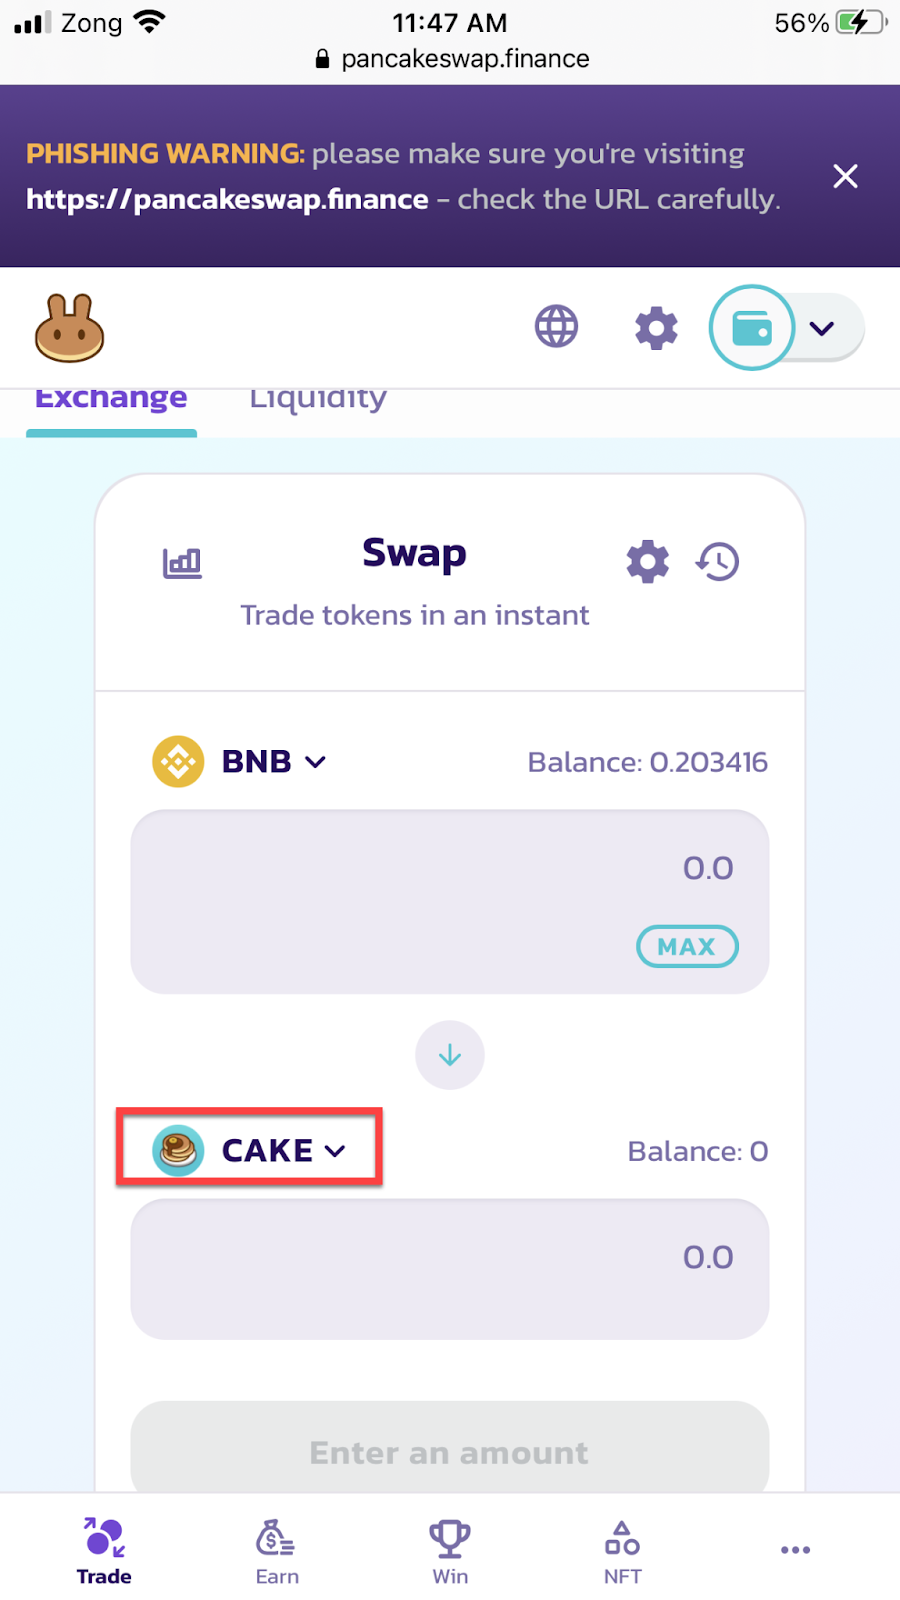
Once you’ve deposited BNB, open the PancakeSwap and click on the Trade button.

On the trade page, you will see two tokens displayed on the screen—BNB and Cake. Follow the next step if you want to add your own altcoin.
3. Adding a Token:
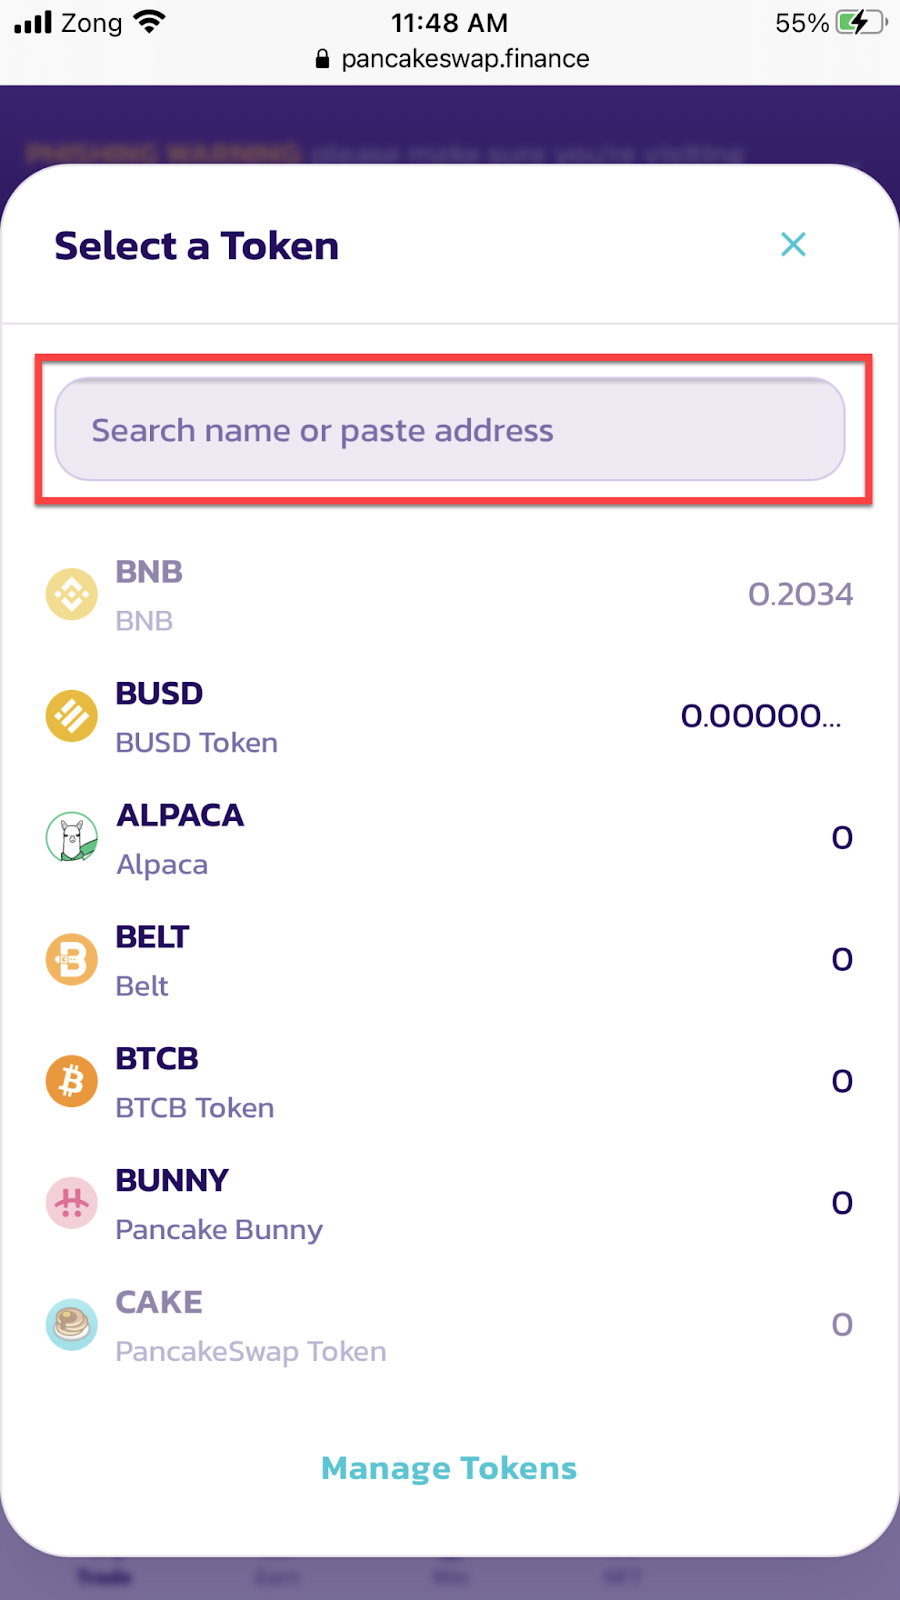
To do so, click on the token icon (like Cake), a pop will appear.
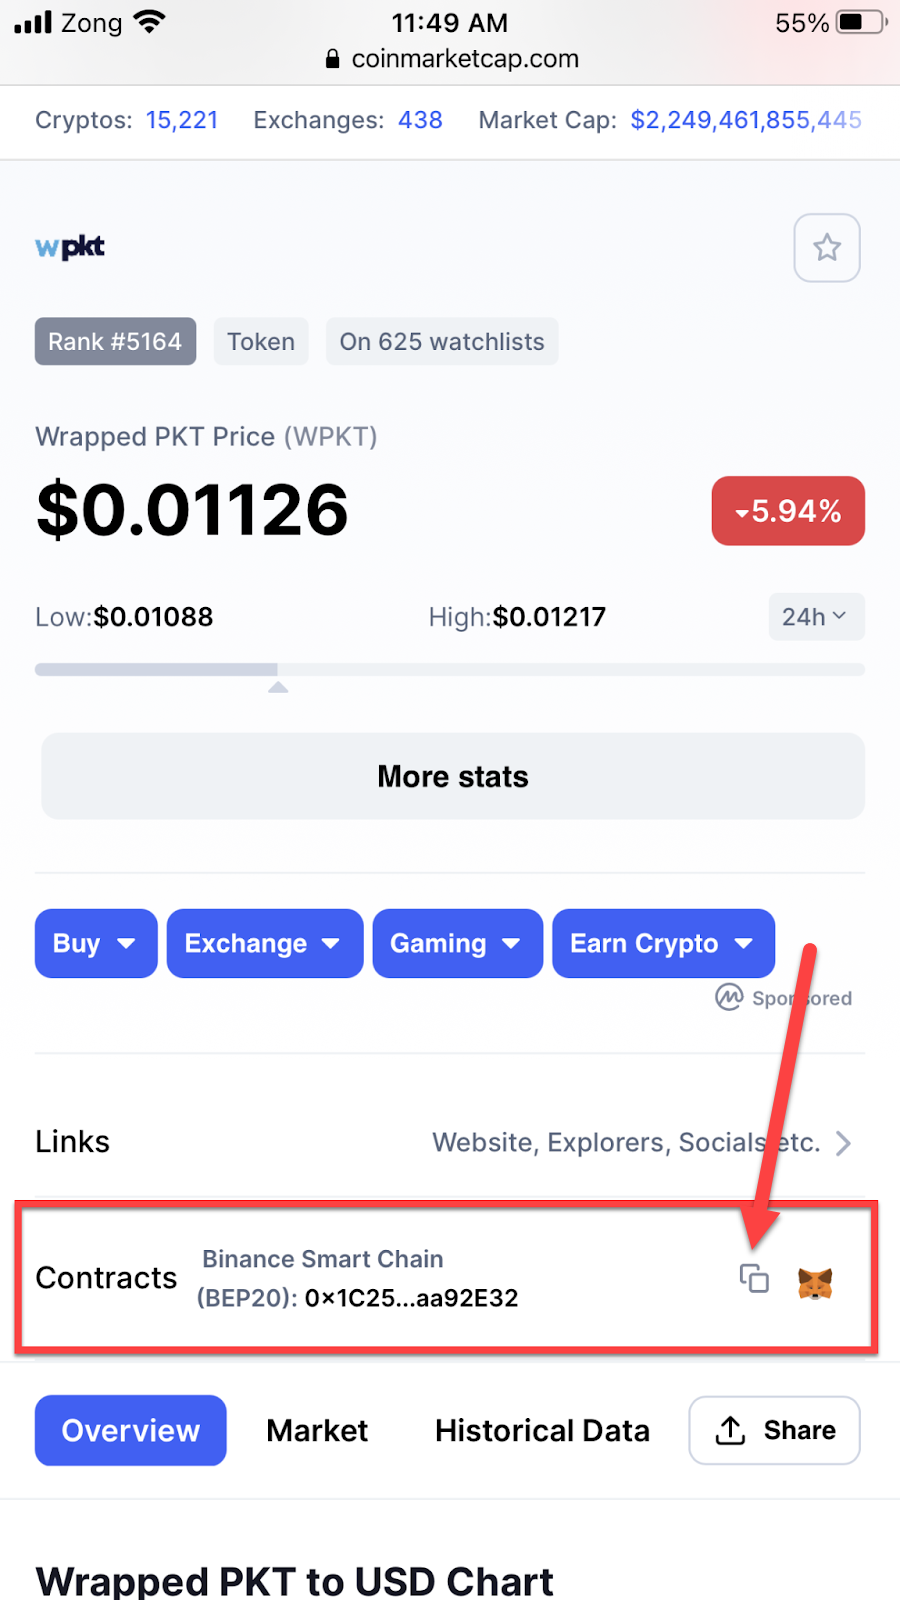
Since the coin is not present in the list, paste the coin's contract address in the search bar. You can get the contract address from Coinmarketcap or from the official website of the token. I wish to purchase WPKT, so I will demonstrate how to do so.
You will go to the "CoinMarketCap." From here, you will copy the address of the Wrapped PKT.
After you paste the token’s address, it will show the token on the screen. You can add the coin by clicking on the import button.

Upon receiving the message, you will be prompted to check the box; after that, you will tap the "Import" button.

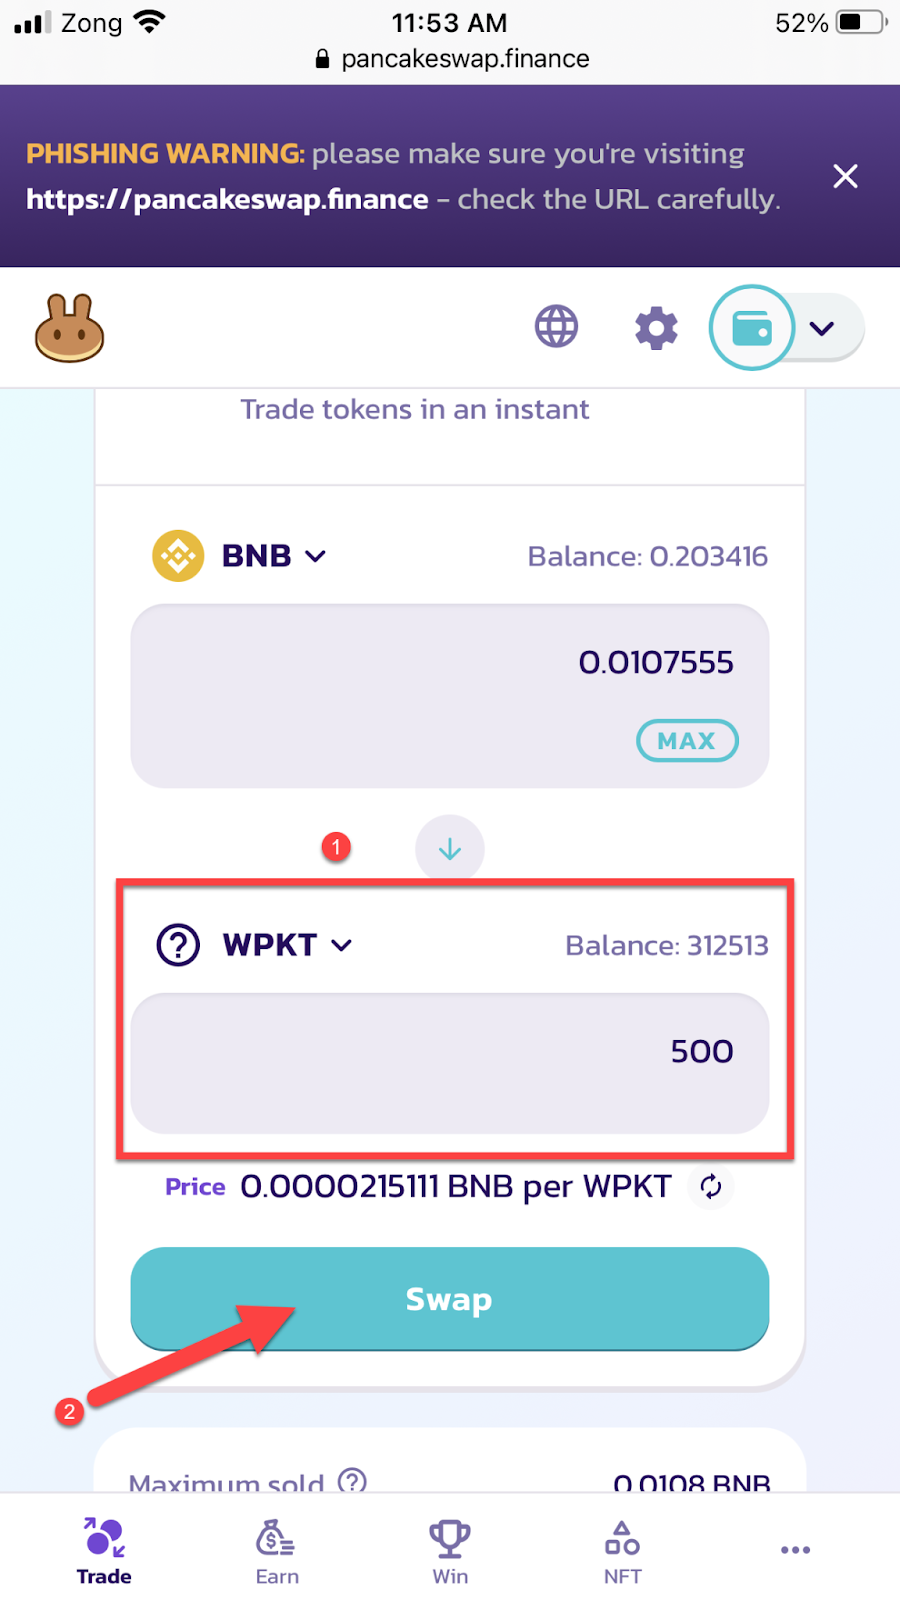
Having added the coin, you can now swap BNB for WPKT or any token you want to swap.

Before swapping, you will click on the Settings icon and change the slippage rate for the transactions.
Note: You should try going from the lowest to the highest.

The final step is to enter the amount of the number of coins you require and click the "Swap" button.
The coins will be added to your wallet if the process is successful. Don’t hesitate to ask me a question on a Twitter DM 😊
